Sunday, November 25, 2012

Chunky Monkey Pancakes


 Pancakes are one of the best weekend breakfasts. Whether loaded with chocolate chips, blueberries, or just plain covered with peanut butter, nutella, or syrup, they are delicious. On the weekends I like to try new breakfasts recipes that are typically a little richer or sweeter than your typical breakfast. These pancakes from Our Best Bites fit that. As an added bonus, these pancakes utilize over-ripe bananas. Not only do these pancakes have bananas in the batter, there is also chocolate chips. Oh and one more thing, they are drizzled with peanut butter syrup. It's reminiscent of maple-glazed donuts, specifically those from Casey's (if you are from my area you know what I mean). These pancakes are an awesome weekend breakfast with just enough sweetness.

Time: 15-20 minutes
Yield: 14ish pancakes
Ingredients
1 1/2 cups flour
3 Tbsp sugar
2 tsp baking powder
1 1/2 tsp baking soda
1/4 tsp salt
1 1/2 cup buttermilk (or 1 1/2 Tbsp vinegar or lemon juice mixed with milk to make 1 1/2 cups)
1 tsp vanilla extract
1 Tbsp vegetable/canola oil
1 large egg
2 medium ripe bananas
6 Tbsp mini chocolate chips (or regular chips roughly chopped)
2 tsp flour
1 cup maple syrup
1/2 cup peanut butter


Whisk flour, sugar, baking powder, baking soda, and salt in a large bowl.


In a separate bowl, whisk buttermilk, vanilla, oil, and egg.


Add the wet ingredients to the dry and mix until just combines. Lumps are ok in pancakes batter


Let that mixture sit off to the side and address the browning bananas. You know, the ones that you don't want to eat but aren't quite ready to freeze for banana bread later.


Peel those sweet bananas and mash them in a bowl. Take out some pent up aggression on those bananas. Although I hope you are too frustrated on a Saturday or Sunday morning.


Also at the point, ready the chocolate. These pancakes wouldn't be as rich as intended without the chocolate. If you have regular chocolate chips, take a knife to them...


...and then toss the chocolate with those 2 tsp of flour. You could skip this step, but the chocolate would probably sink to the bottom of the batter without it. 


Fold the mashed bananas and the flour-coated chocolate chips into the batter.


Now get that skillet or griddle ready! Heat it over medium heat. When hot, use cooking spray or butter (preferred method) to coat the surface. Use 1/4 cup measuring cup to scoop the batter and make those delicious disks. You can use 1/8 cup if you want smaller pancakes. 


When the edges are set and the surface of the pancakes start bubbling, flip them!


Cook until lightly browned on both sides.


Now that pancakes are ready, or at least close to being ready, get that syrup and peanut butter.


 Heat 1/2 cup peanut butter in a small bowl for about 30 seconds. Stir in 1 cup of maple syrup until combined and then heat for another 30 seconds. This stuff isn't necessary, but it's definitely desired. So peanut buttery, sweet, and rich. It's amazing.


Or if you are feeling lame, just skip the peanut butter syrup and enjoy your banana chocolate chip pancakes.


However you enjoy these chunky monkey pancakes, make them! You won't regret it!
Original recipe at http://www.ourbestbites.com/2010/09/banana-chocolate-chip-pancakes-with-peanut-butter-syrup-chunky-monkey-pancakes/#comment-422913 


Sunday, October 28, 2012

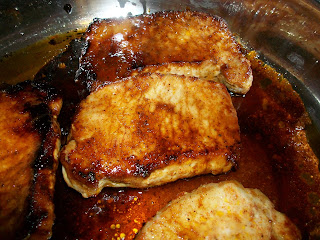
Sweet and Spicy Glazed Pork Chops


This blog post if finishing up a pretty great 3-day weekend. Friday consisted of watching Halloween movies, carving pumpkins, and getting lost in a corn maze with friends. Saturday started with hot cocoa in bed from D (that's now husband's name here...I wasn't feeling very clever) and a trip to farmer's market for apples, cider, peppers, and spices. I also enjoyed time with co-workers from one of my schools. Today was a morning of laziness and an afternoon of playing board games with some pretty great people. We played games until about 6:00 and I didn't plan dinner ahead of time. Thankfully, I had some pork chops thawed in the fridge and knew I had a couple recipes that took little time to prepare and cook.

D and I use to eat chicken for practically every meal. Thankfully we have branched out. We have much more variety in what we eat, and pork chops are among the various things I make now. Before last year I don't think I had ever cooked a pork chop. I bought some on a whim because they were on sale and now we have 1-2 per month. They are so tasty and cook so quickly. This particular recipe comes from Beth M at Budget Bytes and it is a tasty sweet heat dish. The ingredients are minimal and time is less than 30 minutes so it's a great way to whip up a yummy dinner. If you are a fan of pork and like sweet heat, try these!

Yield: 4 pork chops
Time: 25ish minutes
Ingredients
4 thick cut pork chops (bone-in or not; thin chops may also be used, you just have to watch them)
olive oil
1/4 cup brown sugar
1/2 tsp cayenne pepper
1/2 tsp garlic powder
1/2 tsp paprika
1/2 tsp salt
1/2 tsp pepper

Preheat oven to 350.

Combine brown sugar, cayenne pepper, garlic powder, paprika, salt, and pepper in a small bowl.


Rub that delicious spice mix on those pork chops. I'm lazy so coated one side of the chops while they were still in the packaging and then coated the other side once I put them in the pan. Probably not the smartest thing to do, but I did it any way. However you do it, coat both sides and use all the spice mix.


Pour enough olive oil in a oven-safe skillet to cover the bottom. (You don't have to use an oven-safe skillet, but it makes life easier.) Once the oil is hot, toss those chops in.


Let them cook about 5 minutes and then flip them. They should be a pretty golden color. Let them cook another 5 minutes or so to brown the other side. To finish up the cooking, transfer the whole skillet into the oven. If your skillet isn't oven-safe transfer the chops to a oven-safe surface and try to take the liquid/glaze too.


Let the chops cook until done, about 5 more minutes. The glaze should also have thickened with this time as well. That's it! Before you plate these suckers I would rub them around in the glaze to get as much deliciousness as possible. If you want to move the skillet after you have taken it out of the oven, please remember to use a hot pad. I don't often use my skillets in the oven and when I do, I'm prone to forget that the whole skillet is hot. I have given myself a handful of blister by attempting to pick up a oven-hot skillet by the handle. Please don't make my mistake! Also, soak this pan while it is still warm (not hot, but warm) to help clean it with a little more ease.

Enjoy!


Original post at http://budgetbytes.blogspot.com/2010/08/glazed-pork-chops-655-recipe-163.html

Sunday, October 14, 2012

Mini Pecan Rolls


Who doesn't like cinnamon rolls or other sweet, sticky rolls? I don't think I have ever met a person who disliked rolls of these kinds. Making homemade rolls can be a pain, but there are many shortcuts you can take to make them and they are still delicious. I'm not sure how I came across this recipe but Pillsbury has a delicious short cut to yummy rolls that uses a tube of their crescent rolls. They require a little bit of time, but they are definitely worth it. I love them because they remind me of something my mom used to make when I was younger. She made the caramel mixture and then threw in canned biscuit chunks. It's a much quicker variation. I knew when I saw these I had to try them. My husband asks for them often. So if you ever need something sweet for breakfast or anytime really, you should try these nutty, caramel rolls.

Time: 45 minutes
Yield: 16 mini rolls

Ingredients
1/4 cup butter
2 Tbsp light corn syrup
1/4 cup brown sugar
1 tube crescent rolls (reduced fat works just as well as regular)
2 Tbsp sugar
1/2 tsp cinnamon
1/4 cup finely chopped pecans

Preheat oven to 375 F

Melt butter in a pie pan.

 Mix in corn syrup and brown sugar. If you want you can mix these three in a small bowl and then spread the mixture in a pie plate, but I'm a fan of fewer dishes. Set your caramel mixture aside.


Open the crescent rolls and separate out the 4 rectangles. Pinch the triangles together to make a full rectangle. I flip the rectangle over and pinch the other side too just to make sure it stays.


Mix together the cinnamon and sugar and dust it on top of the rectangles. If you want, you could probably cut the amount of sugar down, but why would you do that?


Then sprinkle the nuts on top. If you really don't like nuts, you could omit them, but they do make them that much more delicious.


Finally roll the rectangles starting with a short side. I don't roll very evenly, but just do your best.


Slice each roll into 4 mini rolls.

Now gently stand up each mini roll in the butter/syrup/sugar mixture. It's ok if there is some space between them because the rolls will expand. With that being said, you don't have to leave as much space as I did.

I was quite proud of that pretty little roll in the middle there. :)
 Throw the pan in the oven for 20-25 minutes. As soon as they are golden brown the the caramel mixture is bubbly, they are done. Let them sit in the pan for 1 minute or so.

Carefully flip them out onto a plate or foil and let cool before eating. These can hurt if you eat them too hot. They are amazing warm. Grab a glass of milk and enjoy!


Original post at http://www.pillsbury.com/recipes/petite-caramel-pecan-rolls/9f53c90b-ca18-4c56-84ee-c3d167149a06/

Saturday, September 22, 2012

Enchiladas (With Homemade Sauce)

Enchiladas are one of those dishes that can be made in so many different ways with different fillings, sauces, textures, etc. I've always enjoyed enchiladas but was never big on making them until the past few months. I came across a homemade red enchilada sauce from Recipe Girl and thought it was worth a try. I had only liked homemade enchiladas with white sauce, but only because I don't like canned red sauce. This recipe provided a solution to that issue. I will the sauce recipe and how I prepare my enchiladas. Take it and run with it!

Time: Sauce: about 15-20 min; Enchiladas: about 30-45 min (depends how speedy you assemble.)
Makes 6-8 enchiladas and about 2 1/2 cups of sauce
Ingredients for sauce
1/4 cup vegetable or canola oil
2 Tbs flour
2 Tbs chili powder
1 can (8 oz) tomato sauce
1 1/2 cups chicken broth
1/2 tsp cumin
1/2 tsp garlic powder
1/2 tsp onion salt (or just regular salt)
1/4 tsp salt (or just to taste)
Dash of pepper

Ingredients for enchiladas
2 cups cooked chicken, shredded
2 cups grated cheese (whatever kind floats your boat)
1/2 onion, diced (opt.)
1 bell pepper, diced (opt.)
sauce
6-8 flour tortillas, soft taco size

To get the sauce going, heat the oil in a skillet or sauce pan over medium high heat until it shimmers. Whisk in the flour and chili powder and reduce the heat to medium. Keep whisking until the mixture is smooth and becomes slightly golden.

Needs just a bit more time at this phase.
Once the roux is ready, gradually whisk in everything else. Keep whisking and stirring until it's smooth. Make sure to taste it and adjust the spices as you need. Let it simmer over medium-low to medium heat for about 10 minutes or until it is the desired consistency. It will thicken the longer it sits.

After about 10 minutes it will thicken up and look like thick tomato soup. Set this aside until you are ready to assemble the enchiladas.


While your sauce is simmering, you can mix up your enchilada filling. If you are using veggies in the filling, I recommend sauteing them until they are slightly tender first. Toss the chicken, 1 cup of cheese, and veggies in a bowl to combine. Add in the amount of sauce you want. I start with 3/4 or 1 cup and decide from there.
  

Once your filling is to your liking, start filling! I just scoop 2-3 big spoonfuls into to middle of a tortilla and go from there. From here on it's really all about preferences.While you are doing this go ahead a preheat your oven to 400 F.
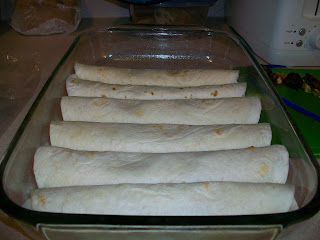

Roll up all your enchiladas and place them in a lightly greased dish. If you want to put sauce in the bottom of the dish, go for it. I prefer not to. The next step is another one based on preference. I like to bake my enchiladas naked until they start to brown on top, about 10 minutes.


I do that because I don't like squishy enchiladas. This step just helps them keep their structure. If you don't want to do that, pour the sauce on top, sprinkle the cheese and bake. If you are like me, bake the naked enchiladas until brown and then top with sauce and the rest of the cheese. *A word on the sauce. The last time I made these, I used all the sauce. If you like saucy enchiladas, use the whole recipe. I don't like them real saucy, so I don't use all of it. Use what you want.
 

 Bake those suckers until the sauce is bubbly and the cheese is melted. Finally, dig in!


Enjoy!

Original post at http://www.recipegirl.com/2006/05/01/enchilada-sauce/

Thursday, August 30, 2012

Garlic Chicken Pasta

Mmmmm...pasta.. I really love it. I try to only make it once a week. Normally that does satiate my cravings, but some times I want it more! This week I broke down and made pasta dishes twice. I threw together an Asian noodle dish with some leftover spaghetti noodles and veggies that needed to be eaten a couple days ago and tonight I made this Garlic Chicken Pasta that I came across on Kevin & Amanda's blog. They adapted it from another blog and I am now adapting it from them. It delicious as is, but I think it is even better with my additions.

If you are on some sort of diet that says no pasta, cream, or bacon, I would stop reading now. If you love everything delicious, continue. This pasta has a sauce very similar to alfredo, but it has a kick. It doesn't take long at all and it is a great weeknight dinner.

Before I go any further, I should mention that TBDH is no longer To Be Determined Husband! He recently accepted a job as Technology Support Specialist in a small school district and is enjoying his job so far. So exciting! But now he needs a new name! My brain is a little dead and I am not feeling very creative so I will have to come up with something before my next post. Now back to deliciousness.

Time: 20ish minutes
Yield: about 4 servings
Ingredients
10-16oz pasta (depending on what kind of pasta:sauce ratio you like)
1 1/2 of cooked, shredded chicken (or however much you want, really)
6-8 slices cooked bacon crumbled
 2 Tbsp butter
3 gloves of minced garlic
1 cup heavy whipping cream
Couple tsp of black pepper (depending on taste)
3/4 cup shredded Parmesan cheese
1/4 cup white wine
Dashes of cayenne pepper, oregano, and basil (or other desired herbs)

Prepare the pasta and drain. For two of us I used about 3 handfuls of pasta. The original recipe calls for Farfalle, but I used Penne this time. It's really up to you. Dump the pasta back into the pot and toss the chicken with it. Let it hang out while you prepare the sauce.


Melt the butter in a saucepan over medium-low heat. Toss in the garlic and stir.


Add in the whipping cream, pepper, wine, and spices/herbs.


Stir to combine and whisk in Parmesan cheese. Whisk the sauce until smooth. It will probably take 3-4 minutes. Taste and adjust for preferences.


Stir bacon into sauce.

I could eat this whole little bowl...
Dump sauce on top of pasta/chicken mixture. For best results let the pasta sit for a few minutes to thicken and combine. Now try to not eat every last bit by yourself!


Original sources 
http://www.kevinandamanda.com/recipes/dinner/becky-higgins-garlic-chicken-farfalle.html
http://www.beckyhiggins.com/recipes/?p=21

Tuesday, August 7, 2012

Easiest Pasta Ever

Pasta...so delicious.. Pasta is really one of my favorite types of food. If I had my way, it would probably have it's own section on the food pyramid. I love all kinds of pasta...light, creamy, saucy, with meat, with veggies, long, short, shell-, wheel-, spiral-shaped, wheat, made from potato, filled..you name it, I probably like it. Anyway this is one of the easiest pastas ever. It takes very little time to make and keep be adapted in any way. Lots of Italian restaurants serve it under the name Aglio e olio and it is worth trying. We never had a recipe for this because it is so simple to make, but I came across this one from YumSugar and I liked the ratios it suggested. So if you are looking for a light, quick pasta dish, you should try this one.

Time: However long it takes you to boil pasta + 2 minutes max
Yield: 2-4, depending on how gluttonous you feel

Ingredients
7 ounces of your favorite pasta, typically spaghetti or other long noodle is used
2-3 garlic cloves, minced (or more if you are like me)
1 1/2 tsp red pepper flakes (vary this depending on the heat you like)
1/4 - 1/3 cup extra-virgin olive oil
3/4 tsp sea salt
1/2 tsp pepper

Boil your pasta according to directions. I'm going to assume you can read the directions on the box because you are reading this...please don't prove me wrong.


When it's done, drain your pasta and dump it into a big bowl...or the same pot you boiled it in if you are lazy like me.
Dump the garlic, crushed red pepper, olive oil, salt, and pepper on top of the pasta. I know you can handle this...


Now toss it all!


Taste it and adjust seasonings if you would like. That's it! I told you it was easy. Now you can dress it up however you would like. I typically toss cooked chicken in with it to up the nutrition. Cook and season it however you want. Or add shrimp or sausage, or whatever floats your boat. I also love roasted red pepper on this. This pasta just provides a great base for whatever you are wanting. Make it!

Topped with baked chicken, roasted red pepper, and parmesan cheese and served with sauteed zucchini...yum!
Original post at http://www.yumsugar.com/Spaghetti-Garlic-Olive-Oil-Chili-Flakes-21398824